
Bracelet Blank Cuff Guide for Makers and Boutiques
You've found a cuff design that looks right on your screen, but the finished piece either pinches at the knuckles, spins around the wrist, or arrives with a surface that dents during the first wear. That's the point where a low-cost component becomes an expensive product problem. A bracelet blank cuff only works commercially when its fit, metal, finish, and production process are chosen together.
For makers and boutiques, the blank is more than an unfinished strip of metal. It's a repeatable base for stamping, engraving, plating, cord work, rhinestones, and private-label collections. The right blank lets you test a design, produce it consistently, and restock without rebuilding the entire product from scratch.
Why Bracelet Blank Cuffs Win for Makers and Boutiques
A boutique customer wants a personalized gift by the weekend. On the bench, a plain open cuff is ready for a short stamped phrase, while its finish matches the store's existing rings. A standardized base lets you create that piece without waiting for a supplier's finished design, then repeat it for the next order.
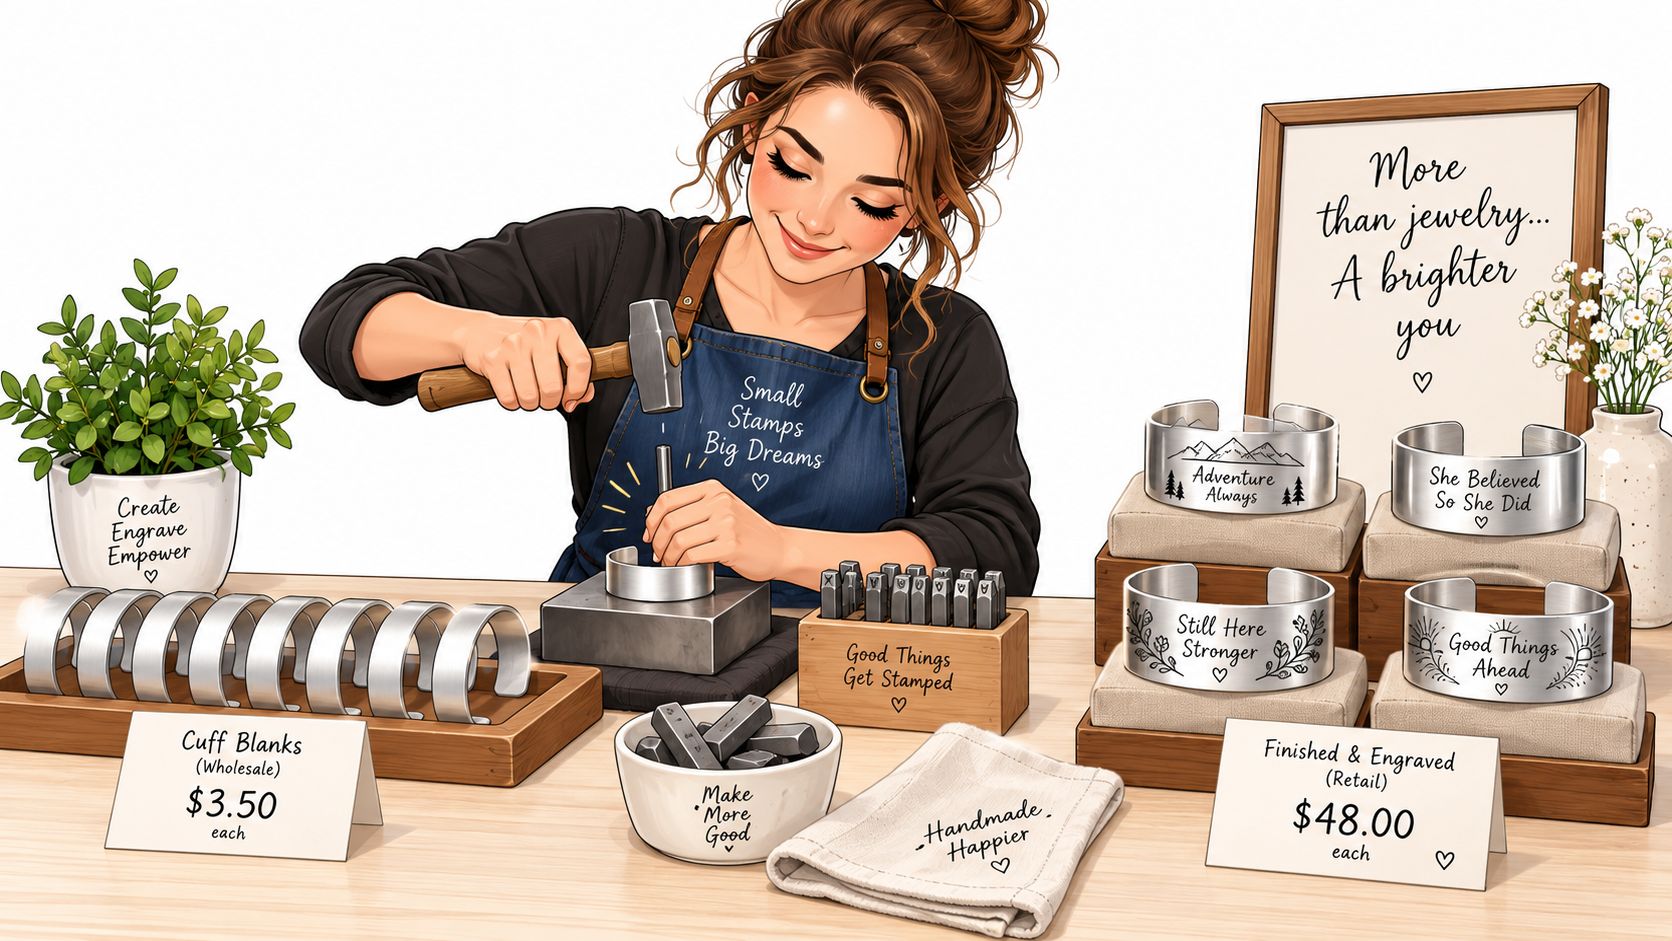
The commercial advantage is control. Bracelet blanks are unfinished, ready-to-customize bases for stamping, engraving, plating, cord work, rhinestones, and private-label collections. Suppliers commonly offer repeatable formats such as 3/8 inch by 6 inches and 1/4 inch by 7 inches, which help a maker reproduce hand clearance, opening width, and decoration placement across a small batch. Independent jewelry-supply guidance describes blank cuffs and bangles as practical formats for mass customization.
Standard sizing also makes production easier to hand off. A second maker can work from the same base, and a boutique can reorder a proven design without rebuilding its proportions. That consistency protects labor time and makes a private-label collection easier to price.
The format has lasting selling power
Cuffs have remained recognizable across long periods of jewelry history. References connect them with Ancient Egypt, Greece, Rome, the Maya, and China. One jewelry history account places cuffs as far back as about 7,000 years, while surviving Egyptian cuffs displayed at The Metropolitan Museum of Art date to about 1425 BC. Their uses included divine status, royalty, protection, and military strength, and Greek and Roman soldiers wore metal or leather wrist cuffs for protection in battle. This jewelry history account provides that context.
The useful retail lesson is recognition. An open, rigid form is easy to understand at the display case, gives customers a visible area for personalization, and works across minimalist, sculptural, mixed-metal, and artisanal collections.
Cuffs also return to fashion in waves. Victorian jewelry included matching cuffs, and wider styles revived in the 1970s, according to cuff bracelet and blank guidance. Fashion coverage continues to feature cuffs in 2025, giving boutiques room to combine durable core designs with trend-led finishes. Recent cuff trend guidance also points to fit engineering and channel compatibility, two factors that affect whether a cuff sells well after the initial visual appeal.
Practical rule: Choose blanks for customization, controlled small-batch production, or a private-label base. Buy finished cuffs when the original design is the product and no alteration is planned.
Before ordering, confirm four points: the blank clears the hand, the opening can be adjusted without metal fatigue, the material suits stamping or plating, and the finished surface withstands normal handling. Those checks protect margin more reliably than choosing the cheapest component.
How to Measure and Size Cuff Blanks Without Returns
A cuff that looks correct on the display can still fail at the fitting table. Wrist circumference alone does not size an open cuff. The blank must clear the hand's fullest point, settle on the wrist without pinching, and resist excessive rotation after forming.
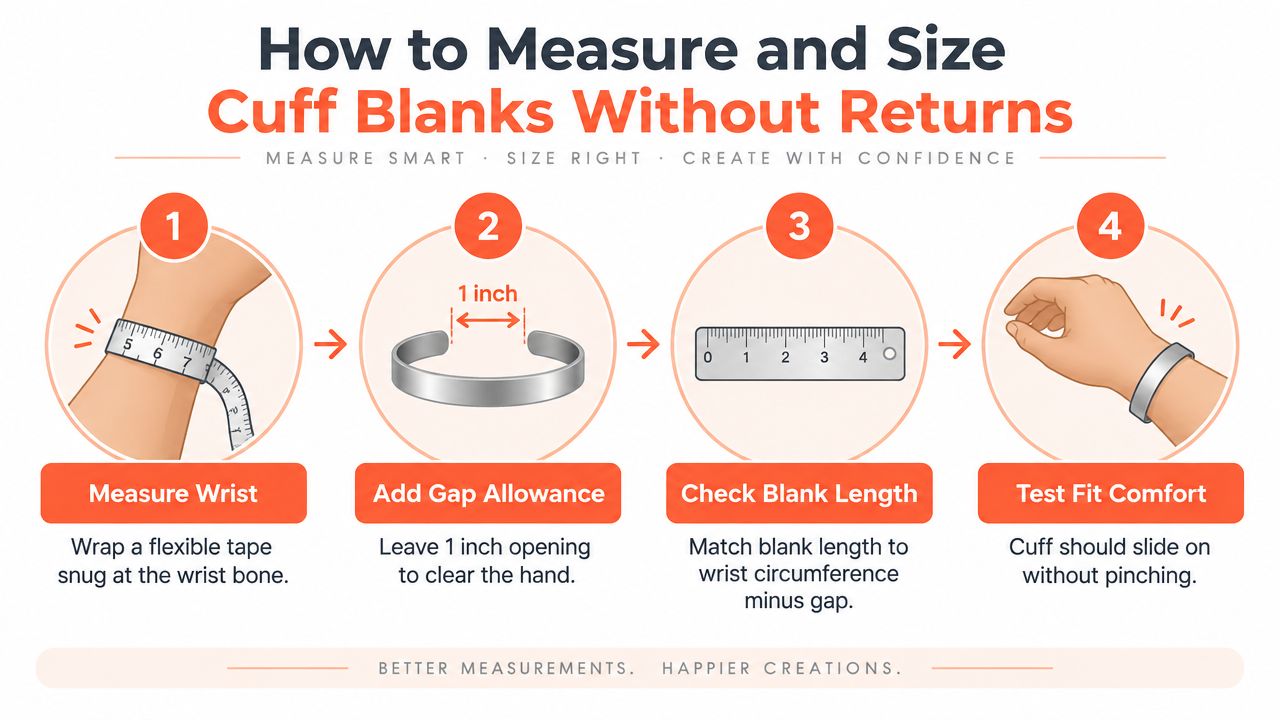
Take three measurements
Use a flexible tape rather than a rigid ruler. Measure the customer's hand at rest, repeat each measurement three times, and use the median. This cuff sizing guide recommends this approach because small changes in tape placement can affect the result.
- Measure the hand. Wrap the tape around the fullest part of the hand and knuckles. Position the thumb as it will be when the cuff passes over the hand. This is the clearance measurement. If the opening is smaller than the knuckle measurement, the cuff may not pass over the hand.
- Measure the wrist. Place the tape just below the ulna styloid, the bony prominence on the outer wrist. Keep the tape snug, but do not compress the skin.
- Measure the forearm flare. Take another circumference measurement above the wrist and compare it with the wrist measurement. A difference above 2.5 mm indicates a high forearm flare. These customers need additional opening room or a hinged construction to limit pressure during wear.
Set the opening deliberately
Start by adding 12–16 mm to the hand measurement when planning the cuff opening. Standard gaps can range from 10 mm for slim, rigid metals to 22 mm for wider designs and lower-yield alloys such as 925 silver. The final opening also depends on blank width, curvature, and hand shape.
A slim metal cuff can use a smaller gap for a cleaner profile and less rotation. A broad cuff needs more entry room because its edges contact more of the hand. Customers with a pronounced forearm flare may need an opening of at least 8 mm, or an articulated hinge, to reduce pinching and failed fits.
Match the blank to the wrist and hand
Adult cuff charts commonly place inner circumferences around 18.5–19.8 cm, with recommended wrist ranges of roughly 16.5–19.1 cm. Many brands allow about 0.25–0.5 in for a snug fit or 0.5–1 in for a relaxed fit. This cuff sizing guide PDF demonstrates why wrist range and hand clearance must be assessed together.
Nominal length is only a starting point. Use this order:
- Clear the hand first. Confirm that the opening accommodates the knuckles.
- Check the inner circumference. Match it to the wrist range, then allow for the intended snug or relaxed feel.
- Inspect the gap after forming. An oversized gap encourages rotation and wear. A tight gap creates pressure points.
- Record the final dimensions. Keep the hand measurement, wrist measurement, opening, and finished inner circumference with the SKU.
For production, form a fitting sample from each material and width before decorating the batch. Test each sample on the smallest and largest intended customer profiles. This catches clearance problems before stamping, plating, or attachment work turns a sizing mistake into finished-stock waste.
Choosing the Right Blank Material and Gauge for Your Project
A cuff that looks attractive on the bench can still fail at retail if the metal dents, the stamp spreads, or the finish irritates skin. Choose the blank according to the finished use, forming method, decoration, and expected wear. Common options include aluminum, brass, copper, sterling silver, and stainless steel. Product references show 14–18 gauge choices across several materials. This rhinestone cuff-making guide also places material and gauge selection in the context of customization.
Gauge changes both handling and perceived value. A lighter blank forms more easily, but it can show tool marks and feel insubstantial. A heavier blank supports a deeper stamp and a broader sculptural form, while requiring more controlled force and stronger forming tools. Treat gauge as part of the product specification, not an isolated measurement.
Comparison at the buying stage
| Material | Best For | Durability and Skin Notes |
|---|---|---|
| Aluminum | Lightweight prototypes and simple decorative work | Dents easily and gives adhesive less reliable long-term support. Handle it carefully during forming and packaging. |
| Brass | Stamping, engraving, and plated fashion pieces | Provides a practical bench material for many custom designs. Choose nickel-free brass when skin sensitivity is a concern. |
| Copper | Artisanal finishes and warm-toned designs | Forms readily and develops distinctive surface character. Plan a clear finish if oxidation or color transfer would be a problem. |
| Sterling silver | Premium hand-stamped gifts and fine jewelry | Supports quality engraving and has strong customer perception. Wider cuffs and lower-yield constructions require careful forming and gap control. |
| Stainless steel | Everyday wear, engraving, and durable retail styles | Resists denting better than aluminum and suits hard-wearing designs. Use stainless steel stamping blank guidance when selecting a steel base for personalization. |
Match the metal to the decoration
Brass and copper are forgiving choices for hand stamping because they accept clean impressions with controlled bench force. Stainless steel requires properly aligned stamps, a stable steel block, and a deliberate strike. Sterling silver can produce a premium result, though careless forming may leave marks that are difficult to polish away.
For rhinestones, cabochons, and other light components, the bond matters as much as the visible surface. Aluminum dents readily and may offer weaker long-term adhesive holding. Nickel-free brass, sterling silver, and stainless steel are generally more dependable bases for sellable embellished cuffs. Match the adhesive to the metal, clean and prepare both surfaces, and allow the bond to cure for 24 hours before packaging, as outlined in the rhinestone cuff guidance.
Channel blanks introduce a separate fit risk. The cord width must match the blank's internal channel width. Similar-looking channels are not automatically compatible, so verify the product specifications before ordering cord or assembling a batch.
Select 14–18 gauge according to the finished cuff. A lighter gauge suits an airy, flexible-looking fashion piece. A middle weight fits standard personalization. Choose a heavier gauge when the blank must carry a broad stamped panel, repeated forming, or a sculptural profile without obvious distortion. For a boutique line, test one formed sample in the chosen metal and gauge before committing to decoration or plating.
Stamping Engraving Forming and Attaching Findings That Hold
A cuff that fits well can still fail at the bench if the lettering shifts, the curve kinks, or a finding lifts during wear. Use a fixed sequence: stamp or engrave the blank flat, form it gradually, then attach findings and embellishments. Curving first makes registration harder and can distort impressions. Adding components before forming exposes them to avoidable force.
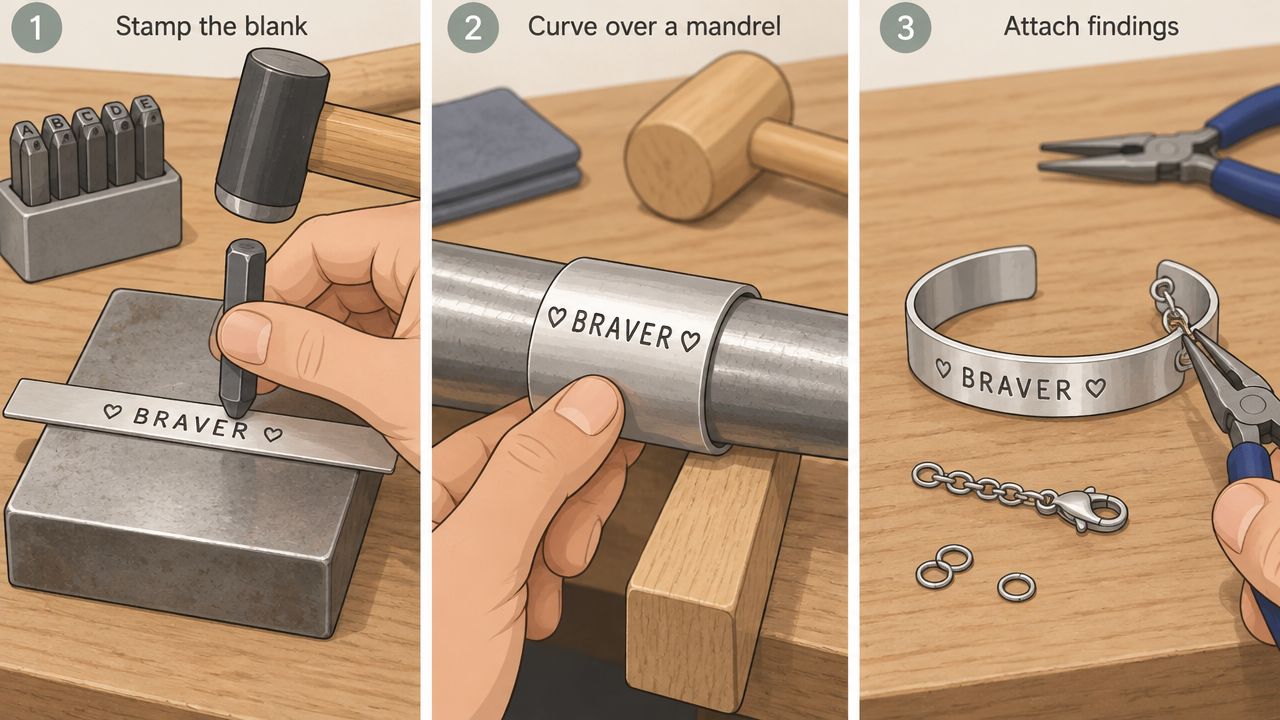
Prepare the flat blank
Deburr every cut edge before setting the blank on a solid steel block. Clean away oil and residue, then mark a centerline with a ruler and low-tack tape. A simple registration jig keeps lettering in the same position across a batch, which matters when several cuffs share one layout.
Strike once with controlled force instead of adding uncertain blows. Deep or uneven impressions are harder to polish and can ripple thin material. Test the stamp on scrap from the same metal and gauge first. Stainless steel especially rewards accurate alignment and a stable block, while softer metals can show excess force quickly.
Engraving has its own cleanup step. Remove burrs with a fine abrasive or scraper, then inspect the groove under magnification. Any raised edge can catch clothing or irritate skin, even if the face appears polished. For more guidance on selecting a durable base, see stainless-steel engraving blank guidance.
Form without kinking
Use a cuff mandrel, bracelet bender, or round form suited to the intended hand clearance. Work from the center toward both ends, moving the blank between passes so the curve develops evenly. Forcing a wide blank over one narrow point creates a flat spot or crease that remains visible under reflective finishing.
Check the opening and inner circumference after each pass. The cuff should clear the hand without forcing the ends apart, then settle at the wrist without concentrated pressure. Keep the gap consistent across a batch, because inconsistent openings create fit complaints even when the nominal size is the same.
Bench check: If the metal springs back, make small adjustments. Repeated aggressive bending weakens the profile and leaves tool marks.
Attach findings with the right bond
Solder suits compatible metal findings when the blank can take heat without harming plating, stones, or other bonded parts. Clean the joint, select flux and solder for the metal, then pickle and refinish the area after soldering.
Use jewelry adhesive for heat-sensitive components such as some stones, cords, leather elements, and already-plated surfaces. Degrease both surfaces, roughen only where the design allows, apply a controlled amount, and support the joint while it cures. Allow 24 hours before testing or packaging. As noted earlier, proper surface preparation and curing determine whether a decorative component remains secure.
For channel blanks, verify that the cord width must match the blank's internal channel width before assembly. Similar-looking channels can hold different cord sizes, so confirm the product specifications before ordering materials for a batch.
Test each attachment with steady hand pressure from several directions. Check for loose stones, lifting findings, weak cord retention, and adhesive squeeze-out before the cuff reaches a customer.
The video below shows a practical visual sequence for making a stamped cuff.
Polishing Plating and Finishing for a Retail Ready Shine
A cuff can be structurally sound and still look unfit for a boutique if the edge catches, the stamped surface is cloudy, or the plating is uneven. Finish the piece in stages, and inspect it under the same lighting customers will see in product photography.
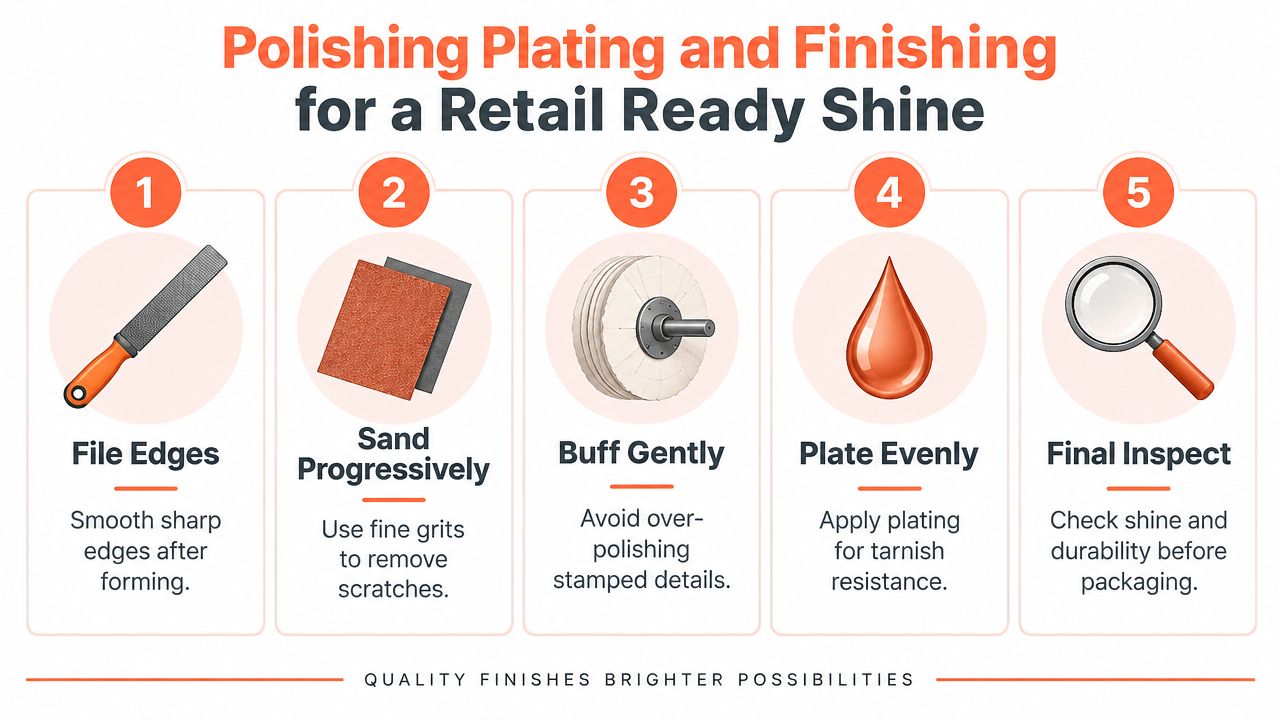
Use a controlled finishing sequence
Start by filing sharp edges and tool marks after forming. Follow with progressively finer abrasives to remove the previous scratch pattern. Keep the cuff moving and support the metal so you don't round a crisp edge or flatten a deliberate contour.
Buff gently once the surface is even. Stamped details are especially vulnerable to over-polishing because a wheel can soften the impression and pull compound into the lettering. Clean the recesses with a soft brush, then inspect the face, edges, and interior separately.
- File edges: Remove sharpness without changing the intended silhouette.
- Sand in stages: Stop only when the earlier scratch pattern has disappeared.
- Buff selectively: Protect stamped and engraved details from excessive wheel contact.
- Clean thoroughly: Remove compound and abrasive residue before plating or packaging.
- Inspect under magnification: Look for pits, lifting finish, burrs, and uneven shine.
Choose plating for the use case
Gold plating creates a familiar fashion finish, but the base metal, preparation, thickness, handling, and customer wear habits all affect longevity. For trend-led collections, 18K Gold PVD is another finish buyers are responding to. A 2026 wholesale-trend analysis reported strong performance for 18K Gold PVD finishes alongside bold accessory categories. That trade analysis supports treating PVD as a relevant option for current wholesale assortments, not as a guarantee of performance for every supplier or use case.
Ask the supplier how the surface is prepared and whether the finish is intended for everyday exposure. Store finished cuffs in individual pouches or separated compartments so metal surfaces don't rub during transit. Add care guidance that covers moisture, chemicals, perfumes, and abrasive contact. Clear expectations reduce tarnish complaints more effectively than promising that any plated finish is permanent.
Presentation also affects conversion. If the cuff is visually complex or customers struggle to judge scale, a digital virtual try-on for jewelry can support product presentation by helping shoppers understand how the design may sit on the wrist. It should complement accurate measurements, not replace them.
Private Label Ordering and Sourcing That Scales Your Margins
Once a blank design sells consistently, stop treating it as a one-off craft project. Turn the proven shape into a small family of SKUs with controlled variables: metal, width, surface finish, personalization method, and packaging.
The global jewelry market was estimated at USD 381.54 billion in 2025 and is projected to reach USD 578.45 billion by 2033, with a projected 5.5% CAGR from 2026 to 2033. Online jewelry retail is projected to grow at the fastest rate in that outlook, with an 8.0% CAGR from 2026 to 2033. Grand View Research's jewelry market outlook provides those projections. For a boutique, the practical implication is straightforward. Your product page, images, sizing information, and restock process need to work together.
Build a controlled assortment
Start with one core blank and create variations that share the same sizing logic. A polished steel version can serve everyday buyers, while a gold-tone or 18K Gold PVD version can support a more fashion-led display. Keep the dimensions stable where possible, because consistent fit reduces customer confusion and simplifies packaging.
Before placing a larger order, request samples and check:
- Material response: Stamp, engrave, form, and polish the exact production material.
- Finish consistency: Compare several samples under direct and diffused light.
- Edge quality: Run a cloth around every edge and inspect the inside curve.
- Channel compatibility: Confirm that cord or inlay width matches the internal channel.
- Packaging tolerance: Test whether the finish scratches during storage and shipping.
- Restock logic: Confirm lead times, available finishes, and whether small replenishment orders are practical.
A no-minimum-order structure lets a small brand validate designs without committing to an oversized assortment. Factory-direct pricing, free-shipping thresholds, and trackable logistics can also affect the true landed cost, so calculate the complete order rather than comparing unit prices alone. Private-label jewelry manufacturer guidance is relevant when moving from a customized blank to a branded product line.
Prepare the storefront correctly
Your cover image ratio is 383:204. Use that exact ratio when cropping the main product image, or important content may be cropped when displayed on your website. A ratio-driven tool that supports exact dimensions can help you set the crop consistently across a collection. This image-cropping tool supports exact ratio-based cropping and custom dimensions.
For a collection with many finishes or personalization options, a Bulk Image Generation playbook can help organize product-image production while keeping the visual system consistent. Still review every generated asset manually. The cuff opening, engraved area, metal tone, and scale must match the actual product.
Treat the launch as a short production checklist: approve the sample, verify hand clearance, record finished dimensions, test the decoration and attachment, inspect the plating, photograph at 383:204, publish care guidance, and set a reorder point based on actual sales. That process turns a bracelet blank cuff into a reliable retail product instead of a component that looks promising but creates returns.
JewelryBuyDirect offers wholesale cuff styles, bracelet-making components, private-label options, and materials suited to different customization workflows, with no minimum order quantity for testing smaller assortments. Visit JewelryBuyDirect to compare cuff blanks and finished styles, validate your fit and finish choices, and build a boutique-ready collection with a more controlled sourcing process.